Whenever I see a sink full of dirty dishes, slowly spilling into my counter space, I sigh in dish-belief. At least in our household, it mostly happens when the dishwasher isn’t working again.
But if there’s one thing we’ve learned over the years: it’s that most dishwasher issues are minor and easy to resolve. More importantly, repairs don’t have to cost an arm and a limb.
Even if your Maytag dishwasher start button isn’t working, we can walk you through all the steps to fix it. Our quick, easy-to-follow solutions should help you conquer your problem and your dishes in no time.
Why is my Maytag dishwasher Start button not working?
If a Maytag dishwasher Start button doesn’t work, it could be caused by an open door, a power issue, a closed water valve, or a locked control panel.
Faulty components may also cause the Start button to fail. In such cases, a replacement is necessary to get the dishwasher back up and running.
Before performing any repairs, here are a few ways to troubleshoot your dishwasher.
- Verify that it’s connected to a power source.
Make sure your dishwasher’s cord is plugged into a functioning outlet and confirm it’s receiving power. If your dishwasher is hardwired, check for a tripped breaker in your home’s electrical panel.
- Confirm that the water supply is on.
Check the connection of the dishwasher to the water supply line. Make sure it’s installed properly and turned on.
- Deactivate Sleep Mode.
Some dishwashers automatically go into Sleep or Standby Mode when left unattended for several minutes. If pressing the Start/Resume button doesn’t do anything, open and close the door firmly to deactivate this mode.
- Reset the dishwasher.
To reset a Maytag dishwasher, press the Cancel/Resume button. Unplug the power cord or turn off the breaker at the house’s electrical panel, then restore its power after a few minutes to reset the appliance.
Causes and Solutions
If your Maytag dishwasher’s start button isn’t working, you don’t need to panic. Most of the time, it’s a minor issue that can be resolved easily without repair services getting involved.
Below, we made a list of the most common causes. We also have step-by-step instructions to help you resolve the issues.
| Causes | Solutions |
| The circuit breaker has tripped. | Inspect your home’s electrical panel and look for the tripped circuit. Flip the switch to the OFF position. Wait a few seconds before moving the switch back to the ON position to reset the circuit. Plug in the Maytag dishwasher’s power cord. Confirm that it turns on and operates properly. If the circuit doesn’t trip, your washer most likely doesn’t have faulty wiring or a manufacturing fault. It should function well if you plug it into a different circuit. Unplug the dishwasher again and plug in the other appliances in the circuit one at a time. Test if they work properly without causing the circuit to trip. If an appliance or light causes the circuit to trip, it may have faulty wiring, which will require servicing. Contact a licensed electrician who can help you diagnose and resolve the issue. |
| Control Lock is engaged. | Press the Control Lock button for three seconds. |
| Delay Start is set. | Click on the CANCEL/DRAIN button to cancel the delay. Click on the START/RESUME to start the cycle. |
| The control panel is faulty. | Disconnect your dishwasher from its power source. Open the door. Use a Torx 15 driver to remove the screws holding the front door panel. Lift the door without latching it and tilt the front panel forward. Unplug the wire connecting the control panel to the control board. Gently lift the front panel up and remove it from the dishwasher. Lay a towel over a sturdy working surface before working on the door to prevent any damage. Then, carefully remove the door insulation. Use a flathead screwdriver to press the retaining tabs mounting the control panel to the door panel. Gently pry the pocket handle out of the faulty control panel using a flathead screwdriver. Install the pocket handle on the new control panel. Align the tabs and press down on each of the four corners. Align the four retaining tabs on the control panel to the slots on the door panel. Then, push them in to mount the panel. Reinstall the door insulation. Align the door panel hangers to the hinges on the door frame and slide them into place. Reconnect the wiring harness to the door. Mount the door panel and reinstall the screws to keep it secure. Close the door and reconnect the dishwasher to its power source. Run a test cycle to confirm that it starts. |
| The door latch is damaged. | Disconnect your dishwasher from its power source. Open the dishwasher door. Use the Torx 15 driver to unfasten the screws on the door frame. Lift the door without latching it, and tilt the front panel forward. Unplug the wire connecting the control panel to the control board. Lift and remove the front door panel, then, set it aside. Locate the door latch assembly on the door frame. Use a flathead screwdriver to push its tabs and unmount it from the door. Unplug the wiring harness on the assembly to isolate it from the dishwasher. Get your replacement and plug the wiring harness into its terminal. Mount the new door latch assembly on the dishwasher. Align the tabs on the front door panel with the hinges on the tub. Then, reconnect the control panel’s wire harness to the control board. Reinstall the screws to secure the front panel. Then, close the door shut to check if it latches. Reconnect your dishwasher to its power source. Turn it on and run a test cycle to confirm that it starts. |
| The door switch is damaged. | Disconnect your dishwasher from its power source. Open the door and unfasten the screws mounting the control panel to the door frame using a Torx 15 driver. Lower the control panel to access the door switch mounting bracket. Remove the defective switch. Start by unhooking its wire harness from the divider using a flathead screwdriver. Unfasten the screw mounting the switch to the bracket using a 3/6” nut driver, and remove it from the bracket. Push the tab and unplug the wire harness from the switch to remove it from your dishwasher. Plug the wire harness into the new door switch. Mount it to the bracket, then reinstall the screw to secure it. Slip the wire harness into the clip. Lift and close the control panel. Use the Torx 15 driver to fasten the screws. Close the door and reconnect the dishwasher to its power source. Run a test cycle to confirm that it starts. |
| The door switch mounting bracket is broken. | Disconnect your dishwasher from its power source. Open the dishwasher door. Use the Torx 15 driver to unfasten the screws mounting the control panel to the door frame. Lower the control panel to access the bracket. Use a flathead screwdriver to unhook the door switch’s wire harness from the divider. Unfasten the screw mounting the door switch to the bracket using a 3/6” nut driver. Set the switch aside. Carefully remove the bracket from the dishwasher. Pull out the spring attached to the handle and the bracket. Use a flathead screwdriver to detach the handle. Slide and lift the detachable middle piece from the bracket. Then, set it aside. Get your replacement part. Attach the middle piece to the new bracket until it snaps into place. Attach the handle to the new bracket. Next, hook the spring to the handle and the bracket. Install the new bracket in your dishwasher. Align the locking tabs on each side to keep it secure. Mount the door switch to the new bracket. Then, slip the wires into their tabs. Lift and close the control panel. Use the Torx 15 driver to fasten the screws. Close the dishwasher door and check if it latches. Reconnect the dishwasher to its power source. Run a test cycle to confirm that it starts. |
| The main control board is defective. | Disconnect your dishwasher from its power source. Open the door and unfasten the screws holding the front panel in place using a Torx 15 driver. Close the door without engaging the latch. Tilt the front panel forward and unplug the wire harness connecting the control panel to the control board. Lift the front panel up and remove it from the dishwasher. Take a photo of the electrical connectors on the control board for reference during the reassembly process. Pry on the locking tabs on the connector brace and pull them downward. Pull out the connector brace and box. Unplug all the connectors from the control board. Start by depressing the tab on the wire harness, and pull to unplug it. Use a flathead screwdriver to pry the locking tab mounting the control board. Slide it to the left and pull it forward to remove it from the dishwasher. Get your replacement. Align the control board to the brackets, and then slide it to the right to lock it in place. Use your photo reference to reinstall the wire harnesses to the control board. Slide the connector brace behind the wires and mount it on the retainers. Lift it upward until the tabs snap into place. Reinstall the connector box. Align the door panel hangers to the hinges on the door frame and slide them into place. Reconnect the wiring harness to the door. Mount the door panel and reinstall the screws to keep it secure. Close the door and reconnect the dishwasher to its power source. Run a test cycle to confirm that it starts. |
The circuit breaker has tripped.
If your Maytag dishwasher is properly plugged into its outlet but not starting at all, you might have a problem with the power supply. Your circuit breaker might have tripped either due to overloading, a ground fault, or a short circuit.
Most manufacturers will require you to set up a dishwasher in its dedicated circuit to prevent overloading. If too many high-powered appliances are connected to a single circuit, it can cause the circuit to trip.
Overloading can still be remedied by moving other plugged-in devices to other circuits. With the help of a licensed electrician, you can also opt to upgrade the circuit or the electrical panel.
| Quick Note: Worn-out wires, water, or dust are the most common culprits behind a ground fault. A short circuit, on the other hand, can be caused by faulty wiring in appliances, electrical surges, and even overloading. If you suspect a ground fault or a short circuit, we recommend calling a licensed electrician to resolve your problem. |
Solution: Before resetting the tripped circuit, turn off the lights and unplug all the appliances that could have caused the overload. Then, follow the steps below.
- Step 1: Inspect your home’s electrical panel and look for the tripped circuit.
If your breaker doesn’t have the red window that indicates when the circuit trips, look for a switch that is out of place. It should be right in the middle of the ON and OFF signs.
- Step 2: Flip the switch to the OFF position.
- Step 3: Wait a few seconds before moving the switch back to the ON position to reset the circuit.
- Step 4: Plug in the Maytag dishwasher’s power cord. Confirm that it turns on and operates properly.
If the circuit doesn’t trip, your washer most likely doesn’t have faulty wiring or a manufacturing fault. It should function well if you plug it into a different circuit.
- Step 5: Unplug the dishwasher, and plug in the other appliances in the circuit one at a time. Test if they work properly without causing the circuit to trip.
If an appliance or light causes the circuit to trip, it may have faulty wiring, which will require servicing. Contact a licensed electrician who can help you diagnose and resolve the issue.
Control Lock is engaged.
The Control Lock is a safety function that locks the control panel, except for the Power button, to prevent accidental changes to the dishwasher’s settings. It’s a very convenient feature to have for households with young children.
If this function is activated, your dishwasher won’t run a cycle even if you press the Start button. You’ll have to disable it first to run a new cycle.
Solution: To deactivate the Control Lock on a Maytag dishwasher, press the Lock button for three seconds.
Delay Start is set.
When you activate the Delay Start function of your dishwasher, it will only start at the programmed time. Pressing the Start button will not work until you’ve canceled the delay wash option.
Solution: To cancel the Delay Start function on a Maytag dishwasher, follow these steps:
- Step 1: Click the CANCEL/DRAIN button to cancel the delay.
- Step 2: Click the START/RESUME button to start the cycle.
Other models will require you to press the Delay Start button to cancel the time delay settings. Once the indicator light switches off, your dishwasher should run the programmed cycle immediately.
The control panel is faulty.
Once you’ve ruled out potential power issues, you can inspect your control panel for damage. Whether you have a mechanical or electrical issue, a defective panel will cause the buttons to malfunction.
Consequently, your dishwasher can’t respond to your input when you press the Start button. You have to replace the entire control panel to get it to run again.
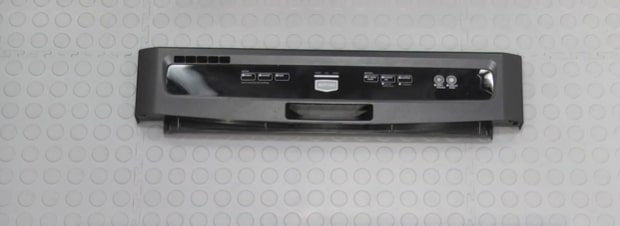
What you’ll need:
- Towel
- Torx 15 driver
- Flathead screwdriver
- New control panel
Solution: To replace a faulty control panel on a Maytag dishwasher, follow these steps:
- Step 1: Disconnect the dishwasher from power.
- Step 2: Open the door and unfasten the screws holding the front panel in place using a Torx 15 driver.
- Step 3: Close the door without engaging the latch and tilt the front panel forward.
- Step 4: Unplug the wire connecting the control panel to the control board.
- Step 5: Lift the front panel up and remove it from the dishwasher.
- Step 6: Lay a towel over a sturdy working surface before working on the door to prevent any damage. Then, carefully remove the door insulation.
- Step 7: Use a flathead screwdriver to press the retaining tabs mounting the control panel to the door panel.
- Step 8: Gently pry the pocket handle out of the faulty control panel using a flathead screwdriver.
- Step 9: Install the pocket handle on the new control panel. Align the tabs and press down on each of the four corners.
- Step 10: Align the four retaining tabs on the control panel to the slots on the door panel. Then, push them in to mount the panel.
- Step 11: Reinstall the door insulation.
- Step 12: Align the door panel hangers to the hinges on the door frame and slide them into place.
- Step 13: Reconnect the wiring harness to the door.
- Step 14: Mount the door panel and reinstall the screws to keep it secure.
- Step 15: Close the door and reconnect the dishwasher to its power source.
- Step 16: Run a test cycle to confirm that it starts.
The door latch is broken.
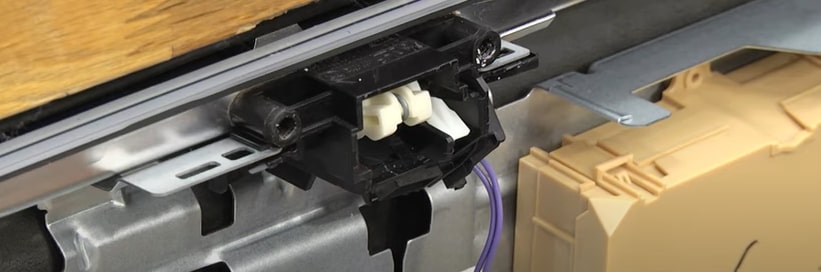
The door latch is a safety feature that locks your dishwasher during cycles, keeping water from leaking out of the tub. With regular use, the latch can get broken, preventing it from activating the safety switch.
This switch is what lets the dishwasher know that the door is closed and that it’s safe to run a cycle.
Simply put, there’s nothing wrong with the Start button. However, your dishwasher won’t be able to run a new cycle until you’ve replaced the door latch assembly.
What you’ll need:
- Torx 15 driver
- Flathead screwdriver
- New door latch
Solution: To replace a Maytag dishwasher’s door latch assembly, follow these steps:
- Step 1: Unplug your dishwasher’s power cord. If it’s hardwired into the power supply, turn it off at the circuit breaker.
- Step 2: Open the dishwasher door and use the Torx 15 driver to unfasten the screws on the door frame.
- Step 3: Lift the door without closing it. Then, tilt the front panel forward.
- Step 4: Unplug the wire connecting the control panel to the control board.
- Step 5: Lift the front door panel up and separate it from the dishwasher. Then, set it aside.
- Step 6: Locate the door latch assembly on the top part of the dishwasher’s door frame. Unmount it by pressing its tabs using a flathead screwdriver.
- Step 7: Remove the damaged assembly from the dishwasher by pressing the locking tab and unplugging the wire harness.
- Step 8: Get your replacement and plug the wiring harness into its terminal.
- Step 9: Mount the new door latch assembly on the door.
- Step 10: Align the tabs on the front door panel with the hinges on the tub.
- Step 11: Reconnect the control panel’s wire harness to the control board.
- Step 12: Reinstall the screws mounting the front panel to the door. Then, close the door shut to check if it latches.
- Step 13: Reconnect your dishwasher to its power source.
- Step 14: Turn on the dishwasher. Run a test cycle to confirm that it starts.
The door switch is damaged.
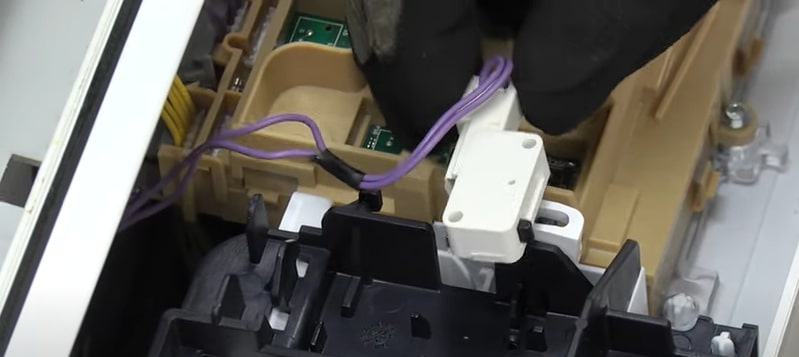
Another safety feature that can prevent your dishwasher from starting a cycle is the door switch. If this component is defective, it can’t send the signal to the control board to run a cycle.
You need to perform a continuity test to check if it’s defective, then replace it if needed. Once replaced, your dishwasher should be able to start a cycle when you press the Start button.
What you’ll need:
- Multimeter
- Torx 15 driver
- Flathead screwdriver
- New door switch
Solution: Isolate your Maytag dishwasher’s door switch and do a continuity test to verify that it’s defective.
- Step 1: Unplug your dishwasher’s power cord. If it’s hardwired into the power supply, turn it off at the circuit breaker.
- Step 2: Open the door and use a Torx 15 driver to undo the screws mounting the control panel to the door frame.
- Step 3: Lower the control panel to access the bracket.
- Step 4: Detach the door switch’s wire harness from its clips using a flathead screwdriver.
- Step 5: Use a 3/6” nut driver to remove the screws securing the door switch to the bracket.
- Step 6: Disconnect the switch’s wire harness. If your dishwasher has a second door switch, repeat Steps 4 and 5 to isolate it.
- Step 7: Get your multimeter and turn its knob to the continuity setting. Touch the probes together to confirm that it’s working.
- Step 8: Touch each probe to a terminal, then press the switch. If the multimeter has no continuity reading, the switch is defective and requires a replacement.
- Step 9: Test the second switch for continuity and replace it if needed.
To replace a Maytag dishwasher’s damaged door switch, follow these steps:
- Step 1: Unplug your dishwasher’s power cord. If it’s hardwired into the power supply, turn it off at the circuit breaker.
- Step 2: Open the door and unfasten the screws mounting the control panel to the door frame using a Torx 15 driver.
- Step 3: Lower the control panel to access the door switch mounting bracket.
- Step 4: Remove the wire harness from its clip using a flathead screwdriver.
- Step 5: Use a 3/6” nut driver to unfasten the screw mounting the door switch to the bracket.
- Step 6: Push the tab on the defective switch and unplug the wire harness to remove it from your dishwasher.
If the second door switch is defective, repeat Steps 4, 5, and 6 to remove it.
- Step 7: Get your new door switches. Plug the wire harnesses into their terminals.
- Step 8: Mount the new switches to the bracket. Reinstall the screws to secure them in place.
- Step 9: Slip the wire harnesses into the clips.
- Step 10: Lift and close the control panel. Use the Torx 15 driver to fasten the screws.
- Step 11: Close the door and reconnect the dishwasher to its power source.
- Step 12: Run a test cycle to confirm that it starts.
The door switch mounting bracket is broken.
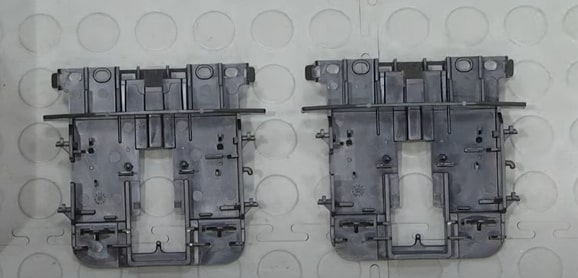
If the door latch and switch aren’t broken, the culprit could be the mounting bracket, which holds the switch in place. Damage to the bracket can also prevent the dishwasher from running a cycle when you press that Start button.
To check the part, you must isolate it from the dishwasher and inspect it closely for any signs of damage. Lucky for you, it’s easy to replace, which you can do in a couple of minutes with our help.
What you’ll need:
- Torx 15 driver
- Flathead screwdriver
- 3/16” nut driver
- New door switch mounting bracket
Solution: To replace a Maytag dishwasher’s door switch mounting bracket, follow these steps:
- Step 1: Unplug your dishwasher’s power cord. If it’s hardwired into the power supply, turn it off at the circuit breaker.
- Step 2: Open the dishwasher door. Use the Torx 15 driver to unfasten the screws mounting the control panel to the door frame.
- Step 3: Lower the control panel to access the bracket.
- Step 4: Use a flathead screwdriver to unhook the door switch’s wire harness from the clip.
- Step 5: Unfasten the screw mounting the door switch to the bracket using a 3/6” nut driver. Set the switch aside.
- Step 6: Carefully pull the bracket out of the dishwasher.
- Step 7: Remove the spring attached to the handle and the bracket.
- Step 8: Use a flathead screwdriver to detach the handle.
- Step 9: Slide and lift the detachable middle piece from the bracket. Set it aside.
- Step 10: Get the new mounting bracket and attach the middle piece to it until it locks in place.
- Step 11: Attach the handle to the new bracket. Next, hook the spring to the handle and the bracket.
- Step 12: Install the new bracket in your dishwasher. Align the locking tabs on each side to keep it secure.
- Step 13: Mount the door switch to the new bracket and slip the wires into the clip.
- Step 14: Lift and close the control panel. Keep it secure by fastening the screws using a Torx 15 driver.
- Step 15: Close the dishwasher door and confirm that it latches.
- Step 16: Reconnect the dishwasher to its power source. Run a test cycle to check if the Start button works.
The main control board is defective.
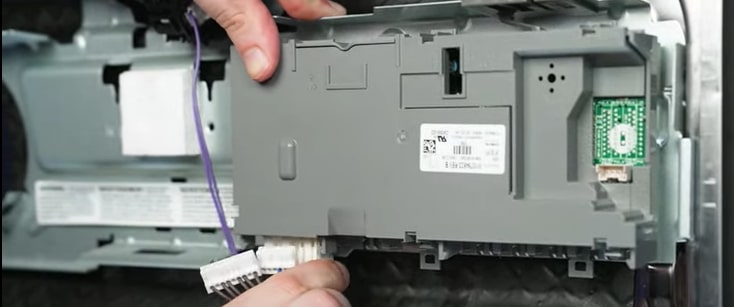
Your dishwasher’s main control board is responsible for a variety of functions, including washing, draining, and drying. When this component fails, the symptoms can vary greatly, making it hard to diagnose.
Once you’ve ruled out everything else, you can consider such a possibility. The best way to confirm this is by performing a continuity test on the control board.
What you’ll need:
- Torx 15 driver
- Flathead screwdriver
- Multimeter
- New main control board
Solution: Isolate your Maytag dishwasher’s main control board and check for continuity to confirm that it’s defective. Follow the steps below.
- Step 1: Unplug your dishwasher’s power cord. If it’s hardwired into the power supply, turn it off at the circuit breaker.
- Step 2: Open the door and unfasten the screws holding the front panel in place using a Torx 15 driver.
- Step 3: Close the door without engaging the latch and tilt the front panel forward.
- Step 4: Unplug the wire harness connecting the control panel to the control board.
- Step 5: Lift the front panel up and remove it from the dishwasher.
- Step 6: Locate the main control board. Check your user manual if necessary.
- Step 7: Take a photo of the electrical connectors on the control board for reference during the reassembly process.
- Step 8: Remove the connector brace by prying on the locking tabs and pulling them downward.
- Step 9: Pull out the connector brace and box. Set them aside.
- Step 10: Depress the tab on the wire harness, and then pull to unplug it from the control board. Repeat the process until all the connectors are unplugged.
- Step 11: Use a flathead screwdriver to pry the locking tab mounting the control board. Slide it to the left and pull it forward to remove it from the dishwasher.
- Step 12: Remove the top cover of the control board housing by prying on the locking tabs.
- Step 13: Flip the housing over. Pry on the three locking tabs to separate the control board from the housing.
- Step 14: Refer to your tech sheet to identify the two fuses on the control board that you need to test.
- Step 15: Get your multimeter and turn the knob to the continuity settings.
- Step 16: Place the probes on each side of the fuse. If the multimeter doesn’t beep, the fuse is bad.
- Step 17: Repeat the same process to check the continuity of the other fuse. If either of the fuses are blown, a replacement is necessary.
If your multimeter lacks a continuity setting, turn the knob to the lowest ohm setting instead. A well-functioning fuse’s reading will be close to the baseline, but if the display doesn’t change, the fuse is no longer serviceable.
Since the fuses aren’t sold separately, you have to replace the entire control board to get the dishwasher to run. The part alone can cost hundreds of dollars depending on your model, but you can save hundreds more by performing the fix yourself.
To replace a Maytag dishwasher’s main control board, follow these steps:
- Step 1: Unplug your dishwasher’s power cord. If it’s hardwired into the power supply, turn it off at the circuit breaker.
- Step 2: Open the door and unfasten the screws holding the front panel in place using a Torx 15 driver.
- Step 3: Close the door without latching it and tilt the front panel forward.
- Step 4: Unplug the wire harness connecting the control panel to the control board.
- Step 5: Lift the front panel up and remove it from the dishwasher.
- Step 6: Locate the main control board. Check your user manual if necessary.
- Step 7: Take a photo of the electrical connectors on the control board for reference during the reassembly process.
- Step 8: Pry on the connector brace’s locking tabs. Pull downward to remove the brace.
- Step 9: Remove the connector brace and box. Set them aside.
- Step 10: Depress the tab on the wire harness, and then pull to unplug it from the control board. Repeat the process until all the connectors are unplugged.
- Step 11: Use a flathead screwdriver to pry the locking tab mounting the control board. Slide it to the left and pull it forward to remove it from the dishwasher.
- Step 12: Get your replacement. Align the control board to the brackets, and then slide it to the right to lock it in place.
- Step 13: Use your photo reference to reinstall the wire harnesses to the control board.
- Step 14: Slide the connector brace behind the wires and mount it on the retainers. Lift it upward until the tabs snap into place.
- Step 15: Reinstall the connector box.
- Step 16: Align the door panel hangers to the hinges on the door frame and slide them into place.
- Step 17: Reconnect the wiring harness to the door.
- Step 18: Mount the door panel and reinstall the screws to keep it secure.
- Step 19: Close the door and reconnect the dishwasher to its power source.
- Step 20: Run a test cycle to confirm that the Start button works.
FAQs
Does a Maytag dishwasher have a reset button?
Like most brands, Maytag dishwashers don’t have a dedicated Reset button. To do a hard reset, you can unplug the power cord for a few minutes and then plug it back in.
If your dishwasher is hardwired into the power supply, turn it off at the circuit breaker. After a couple of minutes, flip the switch back to reset the dishwasher.
Is it worth replacing a dishwasher control board?
The cost of a new dishwasher control board can reach up to $200 or more depending on your model. It’s worth the price, especially if you have a mid to high-end dishwasher that’s relatively new.
You can also follow the 50% rule. When repairs cost more than half the price of a new dishwasher or when your dishwasher has been running for more than half its expected lifespan, it’s best to have it replaced.