Last Monday, my heart was set on baking lasagna for dinner—something I’d been craving for all week. But my oven had other plans.
I hit “Bake” and set it to 350°F, expecting to wait the usual 15 minutes. Nearly 30 minutes later, I was starving and debating whether I should order takeout.
When my oven finally got hot enough, I popped the lasagna right in, but it still came out unevenly cooked. Apart from being hungry, I had a broken oven to worry about.
Since my unit is new, I didn’t want to get a costly repair that takes forever to schedule anyway, and I definitely didn’t want to get a new oven. Luckily for me, replacing a faulty bake element was easier than expected, which I was able to do in a couple of minutes.
Here, we’ll help you figure out why your oven is taking a long time to heat up and show you how to get it back up and running in no time.
Why is your oven taking a long time to preheat?
An oven takes a long time to preheat when it has a faulty component. If the bake or broil elements are defective, the unit will struggle to reach the desired temperatures.
Another potential culprit is a damaged door gasket, which keeps an airtight seal to prevent heat from escaping.
Here are a few things you need to check before making any repairs:
- Make sure the door is closed properly.
When preheating the oven, it’s important to close the door all the way so it can reach the desired temperature.
You should check for obstructions that prevent the door from sealing shut, such as improperly positioned racks, large baking pans, food debris, or dirt.
- Clean the door gasket.
Over time, food debris, grease, and dirt can get stuck inside the rubber gasket of your oven door, preventing it from creating an airtight seal. If there are no signs of damage, you can fix this issue by cleaning it properly.
- Remove any unused racks.
Before preheating your oven, you should take out all the unnecessary racks. When you leave them in, they’ll absorb the heat, prolonging the preheating process and wasting energy.
If your oven is still struggling to reach the desired temperature after making these adjustments, it might have a faulty component. Keep reading our guide so we can help you determine the underlying cause and fix it.
Causes and Solutions
Here’s an overview of the potential causes of an oven that’s taking too long to preheat and their respective solutions.
| Causes | Solutions |
| Damaged Door Seal | Open the oven door. Gently pry off the rubber gasket using your hands. Start at the top corner and work your way around the door until the seal is removed. Dip a clean towel in warm, soapy water. Use it to remove dirt, grease, and food debris in the grooves around the door. Wipe the area dry with a clean towel before installing the new rubber gasket. Get your replacement and position it over the door. Push the rubber gasket into the grooves, starting at the top corner. Work your way around until it’s installed securely. Close the door all the way to ensure a tight, even seal. |
| Defective Bake Element | Disconnect the oven from its power source. Open the door. Use a flathead screwdriver to disengage the hinge locks. Grab the door on each side, and carefully raise it roughly ¾ of the way. Lift up the door and pull it out to remove it. Then, set it aside. Remove the oven racks. Unfasten the screws on the bottom panel to reveal the bake element underneath. After, remove the panel. Use a ¼-inch socket to unthread the mounting screws on the bake element. Disconnect the wires from their terminals. Remove the defective bake element. Get the replacement and slide it into the oven. Then, connect the wires to the terminals. Fasten the screws to secure the bake element in place. Reinstall the racks. Hold the door firmly on both sides and slide its hinges into their slots. Slowly open the door all the way. Then, flip the locking tabs to secure it. Close the door. Reconnect the oven to its power source. |
| Broken Broil Element | Disconnect the oven from its power source. Open the door. Use a flathead screwdriver to flip the hinge locking tabs. Hold the door firmly on both sides, and carefully raise it until you can pull it out. Set it aside. Remove all the racks. If the temperature sensor is mounted inside the oven, unthread its screws. Skip this if it isn’t. Undo all the mounting screws on the broil element. After, pull it out until the terminals are visible. Use a flathead screwdriver to disconnect its wires. Then, take the faulty component out of the oven. Get the replacement. Align the temperature sensor in the slot. Position the new broil element and reinstall the screws to secure it. Mount the sensor in place. Grab the oven firmly on both sides and slide the hinges into their slots. Open the door all the way and flip the locking tabs. Reinstall the racks. Close the door. Then, reconnect the oven to its power source. |
| Faulty Temperature Sensor | Turn off the power from the circuit breaker. Pull the oven away from the wall to access the power cord. Unplug the wire, and slide the unit all the way out. Unthread the screws on the top panel at the back of the oven. Then, remove it and set it aside. Unfasten the screws on the bottom panel. After, lift it up and pull it out. Locate the sensor and unplug its wire connector. Then, loosen the screws mounting it to the oven. Pull out the sensor and set it aside. Get the replacement and slide it into its mounting slot. Fasten the screws to keep it in place. Connect the wire to the new sensor. Mount the top and bottom panels, and reinstall the screws to secure them. Plug in the power cord. Then, carefully push the oven back to its original location. Turn on the power from the circuit breaker. Preheat the oven to confirm that it’s capable of reaching and maintaining the set temperature within a reasonable amount of time. |
| Burnt-out Control Board | Carefully move the oven away from the wall to access the back panels. Disconnect the power plug. Unthread the screws on the top panel at the back of the oven. Then, lift it up to remove it. Unfasten the screws on the bottom panel. After, pull it out and set it aside. Locate the control panel. Refer to your user manual if needed. Take a photo of the wires on the control board. Use it for reference during the reassembly process. Unplug the wires on the control board. Unfasten the mounting screws. Then, remove the control board. If you’re reusing the old overlay, use a putty knife to separate it from the control board. Start along the edges and work your way around until it comes off. Stick the overlay on the new control board. Press down firmly to ensure that it’s secure. Align the new control board on the oven. Reinstall the mounting screws to keep it in place. Plug the wires in the correct terminals. Use the photo as your reference. Mount the top and bottom panels and reinstall their screws. Reconnect the oven to the power source. Carefully move it to its original location. |
Damaged Door Seal

Your oven door comes with a rubber gasket that creates an airtight seal to prevent heat from escaping. When it’s cracked, broken, or worn out, your appliance will struggle to reach the desired temperature.
One way to check for damage is to feel around the door area for hot escaping air. Just make sure not to touch the oven to prevent injuries to your hand.
The dollar bill test is another way to confirm a broken door seal. When your oven is cool, you can slip a $1 bill between the door and the rubber gasket and pull it out carefully.
If there is little to no resistance, the door seal is no longer effective. But not to worry, it’s replaceable, and it’s not expensive.
You can replace the door seal in 5 minutes or less.
What you’ll need:
- Towels
- Warm, soapy water
- New door seal
Solution: To replace an oven’s damaged door seal, follow these steps:
- Step 1: Open the oven door.
- Step 2: Gently pry off the rubber gasket using your hands. Start at a corner and make your way around the door until the damaged seal is out.
- Step 3: Dip a clean towel in warm, soapy water.
- Step 4: Clean the grooves around the door seal to remove grease, dirt, and food debris.
- Step 5: Use a clean towel to wipe the area dry.
- Step 6: Get your new rubber gasket and position it around the door.
- Step 7: Start at the top corner and push it into the grooves to keep it in place. Then, work your way around the door.
- Step 8: Close the door all the way to help the rubber conform to the correct shape, ensuring a tight, even seal.
Quick Note:
If the seal is too tough to pull out, use a flathead screwdriver to pry it off. Do it carefully to prevent damage to your oven.
Defective Bake Element
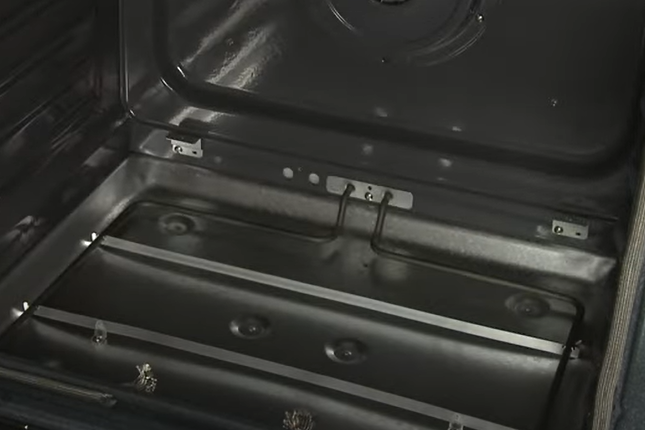
The bake element is a curved metal coil at the bottom of your oven. Since it’s the main heat source for many oven functions, it’s the first thing you should check if your appliance isn’t reaching ideal temperatures.
Once this component is damaged, it can’t be fixed. However, you can replace it with a new part to continue using your oven.
Believe it or not, replacing a bake element is very easy, which you can do by yourself with a few tools. You’ll only need a couple of minutes to complete it.
What you’ll need:
- Flathead screwdriver
- ¼-inch socket
- Multimeter
- New bake element
Solution: First, inspect the bake element for visible signs of damage. If there are none, but you suspect that it’s damaged, a continuity test is necessary to confirm that it requires replacement.
- Step 1: Disconnect the oven from its power source.
- Step 2: Open the door. Use a flathead screwdriver to flip the hinge locking tabs.
- Step 3: Grab both sides of the door with your hands. Carefully raise it until it’s ¼ open.
- Step 4: Lift the door up and pull it out to remove it. Then, set it aside.
- Step 5: Remove the oven racks.
- Step 6: Unfasten the screws on the bottom panel using a flathead screwdriver to reveal the bake element. If your oven doesn’t have a panel, you should skip to Step 8.
- Step 7: Remove the panel and set it aside.
- Step 8: Inspect the bake element for visible signs of damage.
If it’s burnt out, you’ll often see visible breaks or blistering. But if there are none, a continuity test is the best way to confirm that it’s damaged.
- Step 9: Unfasten the screws mounting the bake element using a ¼-inch socket.
- Step 10: Disconnect the wires from the terminals. Then, tilt the element upward and pull to remove it.
- Step 11: Get a multimeter and rotate the dial to the lowest setting for ohms of resistance, or resistance with tone (if available).
- Step 12: Place each probe onto a terminal on the bake element.
If the multimeter shows a reading of 0 to 50 ohms of resistance, it has continuity and requires no replacement. You should check out other parts of the oven for possible defects.
But if the reading doesn’t change, the bake element has no continuity. It should be replaced to get the oven to heat up again.
To replace a burnt-out bake element on an electric oven, follow these steps:
- Step 1: Disconnect the oven from its power source.
- Step 2: Open the door. Use a flathead screwdriver to disengage the hinge locking tabs.
- Step 3: Grab the door on both sides. Carefully raise it roughly ¾ of the way.
- Step 4: Lift the door and pull it out to remove it. Then, set it aside.
- Step 5: Remove the oven racks.
- Step 6: Unfasten the screws on the bottom panel to reveal the bake element underneath. If your oven doesn’t have a panel, skip to Step 8.
- Step 7: Remove the panel and set it aside.
- Step 8: Use a ¼-inch socket to unthread the mounting screws on the bake element.
- Step 9: Disconnect the wires from their terminals. Remove the defective bake element.
- Step 10: Get the replacement and slide it inside the oven. After, connect the wires to the terminals.
- Step 11: Fasten the screws to secure the element in place.
- Step 12: Reinstall the racks.
- Step 13: Hold the door firmly on both sides and insert the hinges into the slots.
- Step 14: Slowly open the door all the way and flip the locking tabs to keep it secure.
- Step 15: Reconnect the oven to its power source.
Broken Broil Element
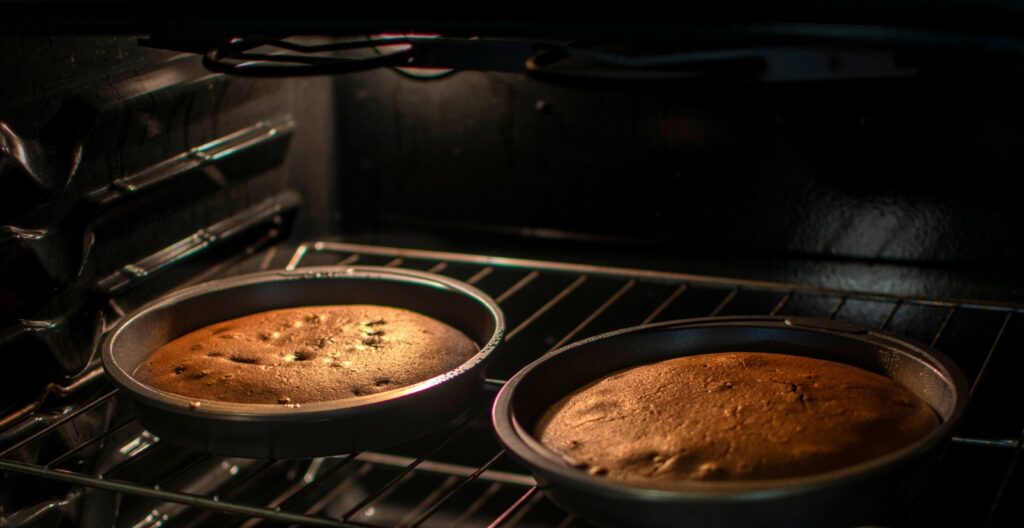
While the bake element is located at the bottom of the oven cavity, the broil element is the one mounted on top—hanging above the racks, often exposed. It provides direct high heat to help char or brown your food.
For many ovens, the bake and broil elements work in tandem to raise the temperature quickly. If either element is defective, your appliance will take longer to heat up.
Like the bake element, this one can’t be fixed once broken. You must replace it with a new component.
What you’ll need:
- Flathead screwdriver
- 1/4” nut driver
- Multimeter
- New broil element
Solution: Once the oven has cooled down, open the door and check for visible signs of damage on the broil element. If there are no noticeable cracks or burn marks, isolate the component and test for continuity using the following steps:
- Step 1: Disconnect your oven from its power source.
- Step 2: Open the door.
- Step 3: Use a flathead screwdriver to flip the hinge locking tabs on both sides.
- Step 4: Hold the door firmly on each side, and carefully raise it until you can pull it out. Then, set it aside.
- Step 5: Remove all the racks.
- Step 6: If the temperature sensor is mounted inside the oven, use a nut driver to unfasten its screws. Skip this step if it isn’t.
- Step 7: Unthread the broil element’s mounting screws.
- Step 8: Carefully pull out the component until its terminals are visible.
- Step 9: Use a flathead screwdriver to unplug the wires from the broil element. Then, take it out of the oven for testing.
- Step 10: Get a multimeter and rotate the dial to the lowest setting for ohms of resistance or resistance with tone (if available).
- Step 11: Touch each probe to a terminal on the broil element.
A functional broil element will have a reading of 0 to 50 ohms of resistance. If the display doesn’t change significantly, the component lacks continuity and should be replaced.
To replace an oven’s broil element, follow these steps:
- Step 1: Disconnect your oven from its power source.
- Step 2: Open the door.
- Step 3: Use a flathead screwdriver to flip the hinge locking tabs on both sides.
- Step 4: Hold the door firmly on each side, and carefully raise it until you can pull it out. Then, set it aside.
- Step 5: Remove all the racks.
- Step 6: If the temperature sensor is mounted inside the oven, unthread its screws using a nut driver. Skip this step if it isn’t.
- Step 7: Unthread the screws on the broil element. After, pull it out until the terminals are visible.
- Step 8: Use a flathead screwdriver to disconnect the wires from the broil element. Then, remove the faulty component.
- Step 9: Get the new broil element.
- Step 10: Align the temperature sensor in its slot.
- Step 11: Position the new broil element and reinstall the screws to secure it.
- Step 12: Mount the sensor in place.
- Step 13: Grab the oven door firmly on both sides and slide the hinges into their slots.
- Step 14: Open the door and flip the locking tabs.
- Step 15: Reinstall the racks.
- Step 16: Close the door.
- Step 17: Reconnect the oven to its power source.
Faulty Temperature Sensor
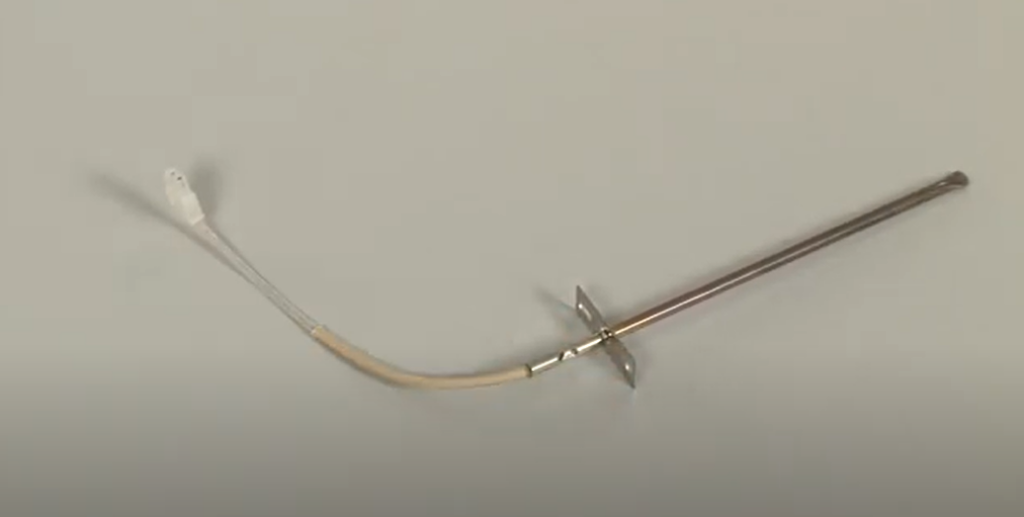
Another component you should look into is the temperature sensor. It measures the unit’s internal temperature and informs the control board, which manages most of the functions.
Once it malfunctions, your oven will not be able to maintain the correct temperature. You have to replace it to continue using your oven.
If your unit has a digital display, you’ll most likely see an F3, F4, F3 E0, or F3 E1 error code, indicating a faulty temperature sensor. However, the best way to confirm that it’s faulty is through an ohm test using a multimeter.
What you’ll need:
- Cut-resistant gloves
- Multimeter
- New temperature sensor
Solution: Disassemble the oven to access the temperature sensor. Perform an ohm’s test to verify that it requires a replacement. Follow these steps:
- Step 1: Turn off the power from the circuit breaker.
- Step 2: Carefully pull the oven away from the wall.
- Step 3: Go behind the unit and unplug its power cord.
- Step 4: Slide the oven all the way out to access the back panels.
- Step 5: Unfasten the screws on the top panel at the rear part of the unit. Then, pull the panel out and set it aside.
- Step 6: Unfasten the screws to unmount the bottom panel. After, lift it and pull it out to remove it.
- Step 7: Locate the temperature sensor at the back of the oven. Refer to your user manual if needed.
- Step 8: Unplug the wire connector from the sensor.
- Step 9: Get a multimeter and turn the dial to the resistance setting.
- Step 10: Place each probe on a pin in the sensor’s electrical plug.
- Step 11: Check the resistance on the multimeter display.
At room temperature, the sensor should have a resistance of around 1,080 ohms. If the results are significantly lower or higher, the component is defective and must be replaced.
Quick Note:
Oven sensors are heat-sensitive, which means they’ll show a different resistance at varying temperatures. For example, if the ambient temperature is 100°F, you should expect the resistance to be around 1,143 ohms.
To replace a faulty temperature sensor in an oven, follow these steps:
- Step 1: Turn off the power from the circuit breaker.
- Step 2: Pull the oven away from the wall to access the power cord.
- Step 3: Unplug the cord, and slide the oven all the way out.
- Step 4: Unthread the screws on the top panel at the back of the oven. Then, pull the panel out and set it aside.
- Step 5: Unfasten the screws on the bottom panel. After, lift it and pull it out to remove it.
- Step 6: Locate the sensor and unplug its wire connector.
- Step 7: Loosen its mounting screws. Some sensors are secured from the back, while others are bolted from inside the oven.
- Step 8: Pull out the faulty component and set it aside.
- Step 9: Get the new sensor and slide it into its mounting slot. Then, fasten the screws to keep it in place.
- Step 10: Connect the wire to the new sensor.
- Step 11: Install the top and bottom panels, and fasten the screws to secure them.
- Step 12: Plug in the power cord.
- Step 13: Carefully push the oven back to its place.
- Step 14: Turn on the power from the circuit breaker.
- Step 15: Preheat the oven to confirm that it’s capable of reaching and maintaining the desired temperature within a reasonable amount of time.
Burnt-out Control Board
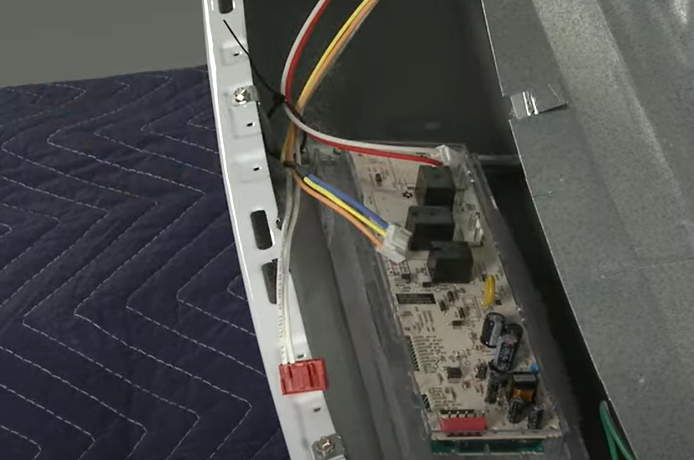
The control board manages most, if not all, of your oven’s functions. If it’s faulty, the symptoms can be varied, ranging from inaccurate temperatures to unresponsive digital displays.
Once you’ve ruled out the most common causes, you should look into the possibility of a damaged control board. In some cases, a quick visual inspection will tell you that the component requires replacement.
Even without visible damage like burn marks or shorted components, it can still be defective. You should perform a continuity test to verify that it’s not malfunctioning.
What you’ll need:
- Screwdriver
- Nutdriver
- Gloves
- Putty knife
- Multimeter
- New control board
Solution: To verify that a control board is defective, you must use a multimeter to check for the correct voltage. If the test doesn’t show the proper input and output voltages, a replacement is needed.
- Step 1: Unplug the oven.
- Step 2: Carefully pull the unit away from the wall. Then, turn it around to access the back panels.
- Step 3: Locate the control panel. Refer to the user manual if needed.
- Step 4: Unfasten the screws mounting the top panel. After, pull it out and set it aside.
- Step 5: Wear insulated work gloves.
- Step 6: Reconnect the oven to its power source.
- Step 7: Refer to the unit’s wiring diagram. Determine the location of the control board’s power input connector and wires.
- Step 8: Get a multimeter and rotate its dial to Volts AC.
- Step 9: Place the black probe on the oven’s input terminal and the red on the power supply.
- Step 10: Check the multimeter display. If it shows 120 volts, it means the control board is receiving the proper voltage.
- Step 11: Activate the bake function. The probes should still be connected to the terminals on the control board.
- Step 12: Check the multimeter display again.
If the display shows close to 120 volts, the control board is sending the correct voltage to the oven components. Since it’s functioning properly, a replacement won’t be necessary.
But if the input voltage is correct, and the output isn’t, the control board is defective. It should be replaced immediately.
To replace an oven’s control board, follow these steps:
- Step 1: Carefully move the oven away from the wall to access the back panels.
- Step 2: Disconnect the power plug.
- Step 3: Unthread the screws on the top panel at the back of the oven. Then, lift the panel to remove it.
- Step 4: Unfasten the screws on the bottom panel. After, pull it out and set it aside.
- Step 5: Locate the control panel. Refer to the user manual if needed.
- Step 6: Take a photo of the wires on the control board. Use it for reference during the reassembly process.
- Step 7: Unplug the wires.
- Step 8: Remove the screws mounting the control board.
- Step 9: Take the faulty component out of the oven.
- Step 10: If you’re reusing your old overlay, use a putty knife to separate it from the control board. Start along the edges and work your way around until it comes off.
Skip this step if you’re using a new overlay.
- Step 11: Install the overlay on the new component.
- Step 12: Align the control board on the oven and reinstall the screws to keep it in place.
- Step 13: Plug the wires in the correct terminals. Use the photo as your reference.
- Step 14: Mount the bottom panel first. Reinstall the screws to secure it.
- Step 15: Align the top panel and fasten the screws.
- Step 16: Reconnect the oven to its power source.
- Step 17: Carefully move the oven to its original position.
Quick Note:
An oven’s control board is usually located behind the control panel. However, this isn’t always the case, so refer to the user manual if necessary.
FAQs
How long does it take to preheat an oven?
The exact amount of time it takes to preheat an oven depends on its size and the desired temperature. Generally, it will take around 15 minutes to reach 350°F, then you add about 5 minutes for every 100°F above that.
Is a defective bake/broil element worth replacing?
Yes, a defective bake/broil element is worth replacing, especially if your unit is only a few years old. A replacement won’t cost as much as a new oven, making it a very cost-effective way to extend the life of your appliance.